|
( Main Bulkhead Replacement, etc. ) [ Return to Home Page ] |
|
by Michael McGoldrick. After two decades of sailing on cruising boats, I decided to try my hand at a little one-design racing. So I purchased a Shark early in the summer of 2001. It has sail # 7, so it is one of the oldest Sharks around, and it is probably one of the first few fiberglass keelboats built in Canada.
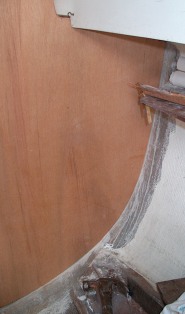
Despite all these upgrades, it was obvious that this boat had also been neglected by at least one previous owner in recent years. When I first saw it, I quickly realized that there was rot in the main bulkhead, in the plywood stiffener on the inside of the fiberglass transom, and in portions of the stringers (the bunk faces) which run on both sides of the centerline. I knew this would require a fair amount of work, but I wasn't too worried because I had successfully completed major projects and repair jobs on some of my previous boats. To replace or not to replace the main bulkhead? Most of the rot in the main bulkhead was found on the starboard side. However, there was still a lot of good wood in it, and as I later discovered, much of this bulkhead was still firmly attached to the hull.
As I proceeded with my plan, I also discovered it would be nearly impossible to remove the starboard bulkhead without destroying the support arch structure which connects to the port bulkhead. I also realized that it would be much easier to replace this arch structure if I also installed a new bulkhead on the port side (which was not absolutely necessary since there was very little rot on the post side). So I decided to replace everything, which meant that my project was becoming much larger than originally anticipated. At least I would have the satisfaction of knowing that I was doing a proper repair job (or so I kept telling myself as the job dragged on).
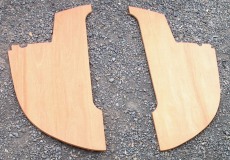
The size of the holes a previous owner had cut out of both the port and starboard bulkheads to install stereo speakers also served to confirm my decision to do a proper repair job. These were large holes, and in my opinion, they were at the upper limit of what could be cut out of the bulkheads without compromising their structural integrity. Removing the old bulkheads. The first order of business was to remove, dismantle, and even cut away portions of the shelves, settees, and other furniture connected to the bulkheads. My next step was to cut off much of the fiberglass tabbing which held the bulkheads in place against the hull. To do this job, I used various cut-off discs on my dremel tool, hand drill, right-angle grinder. I ended up making the most use of my dremel tool. With enough of the tabbing cut away, the final removal of the bulkheads also involved lots of kicking. The combination of rotten wood and my endless kicking caused the lower section of the starboard bulkhead to shred into smaller pieces. Fortunately, the port bulkhead came out cleanly in two nice pieces, meaning that they could easily serve as the all-important template for making replacement units. With both sides of the main bulkhead out of the boat, the interior of the Shark cabin looked surprisingly big and spacious. At this point in the project my wife dropped by
Grinding and sanding.
I did all my grinding and sanding work with a right-angle grinder fitted with a sanding attachment. I used #50 and #80 sanding disks. This set up is very different from a random orbital sander. The disk rotating directly on a right-angle grinder turns at approximately 10,000 rpm (or faster). At such speeds, even #80 sandpaper will eat through a lot of fiberglass very quickly. This makes it easy to do the job quickly, but it also means that it is very easy to accidentally gouge the fiberglass or even grind a hole through the hull. Other tools I found essential for this part of the project include a shop vac, a good quality dust mask, long pants and a long sleeve shirt to help protect my skin from irritation caused by fiberglass dust. Making and fitting the new bulkheads. Making the new bulkheads was a matter of using the jig saw to cut them out of 3/4 inch plywood (using the port bulkhead as a template). I bought a sheet of relatively expensive marine plywood with a nice mahogany veneer. I understand that it may be possible to save a good sum of money by using a lower grade of plywood, as long as it is laminated with a waterproof glue. However, I'm unsure if it is a good idea to use lower grade plywood on a boat.
My final step in making the bulkheads was to seal the plywood edges with epoxy thinned with 10% acetone. This helps protect them from absorbing moisture and water that will eventually find its way into the boat. It's a precaution I take with almost any piece of raw plywood I'm glassing into a boat. Glassing-in the new bulkheads.
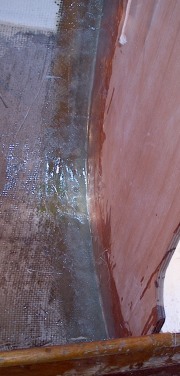
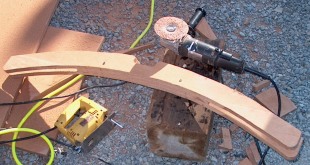
I used epoxy to glass the bulkheads to the hull with a strip of 10 ounce fiberglass cloth which I had pre-cut to a length of approximately 1.5 feet (half a metre) long. The first layer of these fiberglass strips was approximately 4 inches wide (10 cm), the next, 5 inches wide (13 cm), and the next, 6 inches wide (15 cm), and so on. I built up an average of 4 layers of fiberglass tabbing on each side of the bulkheads (6 layers in the area where the chainplate are bolted through the bulkheads). Once the epoxy had hardened, I lightly sanded the rough surface areas. For purely cosmetic purposes, I then applied a thin coat of epoxy over the tabbing. This gave the repair job a nice clean look. I then drilled the holes where the chain plates would be bolted through the bulkheads. Again, it was necessary to seal the plywood that was exposed on the inside of these holes with epoxy thinned with 10% acetone. I used a disposable plastic syringe to inject the epoxy into these holes. Installing the arch support structure. As mentioned earlier, I had to make and install a new arch structure which fits between the top parts of the port and starboard bulkhead units. I built it by cutting the necessary pieces of 3/4 inch plywood modelled after the original arch, and laminating them together with a thick coat of epoxy (a fair amount was required because raw plywood can absorb lots of epoxy). Once completed, I had to get a good fit between the arch and cabin ceiling. This proved to be a little more difficult than I first imagined, and it required numerous adjustments with a sanding disc on my right-angle grinder.
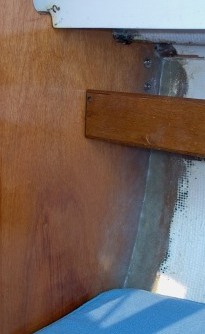
One problem I ran into with this part of the job is that some of the fiberglass putty smeared onto the nice mahogany veneer finish of the ewly installed bulkheads. Fortunately, I was able to remove this mess by lightly going over the veneer finish with a random orbiter sander. I then painted everything with a clear finishing coat, and my job was complete. I dare say that my replacement bulkheads look as good as the original units, and are probably stronger too. Repairing the stringers (bunk faces). There was a fair amount of rot in a two-foot section of the starboard stringer (in the area where it connects with the main bulkhead). The rot on the port side was limited to a small
My first step was to completely cut away the rotten parts of the stringers and replace them with new pieces of plywood. Again, it was necessary to do a fair amount of grinding to remove the old wood and fiberglass tabbing, and to get down to a nice clean surface on the inside of the hull. I also used fiberglass putty to fill in gaps where the replacement pieces of wood fitted into place with the rest of the stringers. The real strength of the repair job was provided by a long piece of 3/4 inch plywood which was installed on the back side of the stringer. This piece of wood covered the entire repair area with a large overlap with the remaining sections of the stringers. Everything was screwed together and then glassed to the hull. Because the reinforcing pieces of wood were added to the back side of the stringers, they are not visible once the settees and cushions are in place. With the work on the bulkhead replacement and stringer repair complete, I was able to rebuild the parts of the settees, shelves, and other internal furnishings which I had cut away at the beginning of my project. Although this did not involve anything overly complicated, I have to admit that this finishing work took a lot longer than originally anticipated. Structural overkill on very old Sharks.
Sometime after I had completed my repair project, I was on a friend's Shark (# 243) and noticed the stringers on his boat were only half an inch thick. I also got a peek inside another old Shark (# 37), and discovered it too had half inch stringers. The only other Shark I know which has one inch stringers is Insanity (#5), a fact I was able to determine by closely examining the photos on the web site about the restoration of this boat. It would be interesting to find out at what point in the production of the Sharks Hinterhoeller switched from one inch to half inch stringers. Whatever the case, had I known that so many Sharks were built with the half inch stringers earlier, I would have probably settled for a less robust repair job. On the other hand, at least I know that I will have a very stiff hull. Repairing the transom stiffener. A large piece of plywood was glassed into place on the inside of my Shark's fiberglass transom to stiffen this area of the boat. This plywood was exposed and not sandwiched between two layers of fiberglass. Unfortunately, this plywood was totally rotten. In fact, it came out like wet cardboard.
Compared to the other repair work, replacing the plywood stiffener in the transom was an easy and relatively straight forward project. However, I forgot to glass-in triangular pieces of wood (about 8 inches/ 20 cm high) that would reinforce everything by joining the inside of the transom with the bottom of the lazarette. As a consequence, I discovered that the transom transmits a great deal of vibration and noise to the rest of the boat when using the outboard motor. (This is an easy-to-do project for next year). Making new handholds.
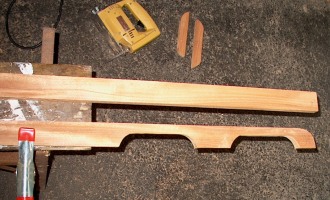
I discovered it was quite easy to make strong and good looking handrails. It didn't take long to cut the basic pattern handholds using a regular jigsaw. A router was necessary to round the edges, and this was the only tedious part of the project. It is not possible to rush the router work and it produced a surprising amount of saw dust and wood chips.
Other projects and restoration work. As everyone knows, maintaining a sailboat to one's satisfaction means there is always another project that we would like to accomplish. The next priority for my Shark will be to work on its bottom - an evil necessity for all sailboats, especially ones that are being raced. Afterwards, I would like to sand off the paint/gelcoat on the deck, cabin, cockpit areas, and then apply a fresh coat of durable two-part polyurethane paint. This would involve re-doing the non-skid areas and re-bedding all the deck gear. This can be a lot of work, but it shouldn't harbour too many surprises as I have already done this kind of project with one of my previous boats. Eventually, I would also like to strip and repaint the topsides. When do I plan to complete all this work? Well.... soon... Maybe sometime before the Shark is recognized as an Olympic Class Sailboat. ;-) © Michael McGoldrick, 2001 |
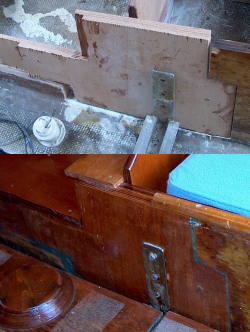
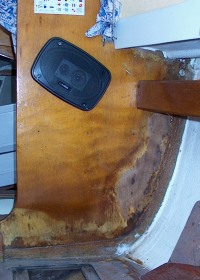 Rot in the starboard side bulkhead.
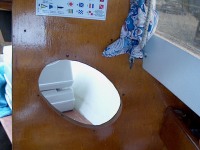 Very large speaker hole in the bulkhead.
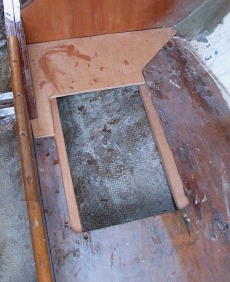
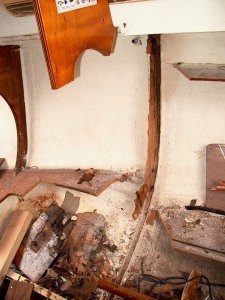 Most of the starboard side bulkhead removed.
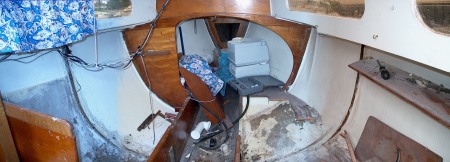 Wide angle shot of the Shark interior without the main bulkhead.